Tuesday 13 December 2011

Matte-Painting Showreel


I am working on my new blog which has all of my Fluid and dynamics tests, link for the same can be found below:

learningfluids.blogspot.com


------
Hi,
It's been a while since I posted anything on this blog.So, here is my first show-reel :


 C&C are most welcomed.


Wednesday 7 September 2011

FINAL PROJECT:

I finished my project on 4th of September and finally got all of the Post -production done including video editing in time.
As mentioned earlier in previous posts I made a tough choice of going along with only 3 matte paintings due to this reason the final outcome is slightly short and in my personal opinion it would have got a  better finish if there was one more matte painting which can bridge up the gap in between the first and second shot.
Below is the link to the final animation:


http://www.youtube.com/watch?v=c2_u_uX_2-Y

Tuesday 16 August 2011

Research and Optimization

I am running out of time as the project is off-schedule so besides rethinking about project management I figured out that there are lots of repetitive and unnecessary tasks which slows down performance and hinders machine outcome. Autodesk Maya being a major tool to me  for 3D projections, has a native language Maya Embedded Language which allows one to make customization in the scene.

I have one script which I wrote to get ride of all unnecessary junk shader nodes and their respective materials which aren't active in the scene. Below is the small snapshot for the script:

Shader_GroupElimination:


As of now I am working on a script which will improve my performance by changing the directory path automatically whenever the image folder inside a project is changed.I will update the screenshot for the GUI I am working on.

Hello everyone,
Unfortunately due to tight schedule I wasn't able to complete the GUI for my scripts but here are some  screen shots of  few scripts I wrote during this project.

Script number 2: Reload Texture Node


Purpose:
       This script in particular is quite time saving for anyone whose project involves lots of dependency on images or external files.As I am working on a Matte Painting Project so I often require to switch back to some image editing software in order to fix my images or files used as textures. This process requires one to update each individual file node separately, if the project has 3-4 external files used as textures in that situation it is quite easy to update texture file nodes. However, in situation where there is more than 50-60 file texture nodes in the scene than it becomes quite uneasy and confusing to click on individual materials in the scene for file texture update.

This script reloads all file nodes in the scene at once with a single call to the procedure. Some of the screen shots for the script is shown below:


BEFORE:


AFTER:


Limitations:Although the code is working fine for my project where I have used default MAYA materials and haven't used Mental Ray Materials . However, in near future to increase the flexibility of the code I will add some changes to this code which will allow it to support mental ray materials and shading groups.
A small bug which is still associated with this script hinders its execution for the first time, the bug is related with the "AEfileTextureReloadCmd" procedure which is  one of the MAYA's inbuilt procedure.
A turnaround for this problem is to click on one of the reload buttons on the file node once and after that execute the procedure.


Script Number03:Change the Directory Path


Purpose: This script is quite essential for me to manage my files and folders throughout the project. As I am working on a limited space on my desktop, usually I get stuck with the low space in case of  heavy rendered images  and other files. Moreover, in situations where I want to move 40-50 files to a new directory I use this script to help me out with the directory change process. The script invokes a dialog box and takes the directory input from the user and updates it for all file nodes in the scene.
Below are some screen shots for this script:

BEFORE: Scene with no wrong file texture path


AFTER:


Limitation:This script does not have a File Browser GUI where user can simply click on the set button and can automatically  set a new path. Moreover, one has to be very cautious while typing in the path in the input box as Maya treats "\" as a key word (which actually means an escape character which tells Maya to treat anything after this symbol as a special character).So a valid path would be:

C:/Users/WhoKnows/


instead of

C:\Users\IKnow\

The same bug associated with the 2AEfileTextureReloadCmd" procedure exists in the script as it is dependent on reload_2DTextures procedure.

A small update on the directory path change script, I fixed few bugs related to nodes espcecially mental ray material file node, more on the script can be found on the below mentioned link:

https://www.creativecrash.com/


I will be refining other scripts and will be preparing a new GUI after finding few bugs while working on different scenarios.


At the Forefront

At the very forefront of my practice were techniques like using Laser data in the form of LIDAR , making use of 3D environment generation applications like Eon's Vue, along with this there were few panorama projection techniques which required HDRI(High Dynamic Range Image) Photography and last but not the least there was the option of building the scene from the photographs and projecting them on 3D objects. As most of the above mentioned techniques are slightly costly and they require specific camera equipments and rigs. So I decided to make use of 3D projection techniques which has it's own merits and demerits which are mentioned below:


For individual project like this , in my opinion it becomes quite essential to prepare some pipeline or workflow to accomplish a task from start to the end. I remember the time during initial stages where I was stuck with a very well known debate of creating a projection based matte-painting through a 2.5D or 3D approach.  After learning about different options starting from simple photo-manipulation techniques to more accurate LIDAR map and panorama based matte-paintings , in my personal opinion I found, that for minor projects where the cost and  other resources like computer processing power are limitations, it is better to stay with the 2.5D solution. Although, techniques mentioned above produced more believable scene however, at the same instance for far distant or wide angle shots where the observer's distance is greater, one can still create realistic scenes while relying on 2.5D camera projection techniques. While thinking about the forefront of my practice for this project I wanted to make use of Eon's VUE as my environment generation tool, whose use is quite prominent in few of the Hollywood movies lately. This particular 3D application demands good computer configuration -for me- however, everything went well as I made my second matte-painting using VUE as my major software application and was quite satisfied with results. There is one more good reason why an individual doing independent projects should avoid using a 3D approach ,  which is more related to the unnatural look of the 3D scene and the amount of time involved in correction of the scene to look more realistic. Therefore to avoid unnecessary headache of excessive rendering time and keeping the date of deadline in mind I chose a 2.5D solution to develop rest of matte-paintings. Moreover, Projection-based  matte-painting techniques still being prominent in the field of films and Television commercials encouraged me to explore more about this technique. 

A small snapshot of my workflow can be found below:

Monday 4 July 2011

Initial Camera Projection

Preparation of 2D matte painting is in progress however at the same moment I felt as if I need a bit practice on the camera mapping because I have not done any camera Projection projects before.So, here is a small animated clip using camera projection inside MAYA2011:


As one can notice that this projection has few issues especially some stretching of textures around geometries.After making adjustments I will update the animation later.
A sample of the Original image:


Reference:

website:http://www.alpack.ie/Coloured_Cardboard_Boxes/Default.280.html(Access Date 22/06/2010)

Matte Painting Sequence Cont....


While working on different shots, I thought of working on the last shot in the sequence with the first shot, as both of them have some similarities. Although the work is in Progress for both shots I will update it regularly to show my progress on both of these shots. The above shot will represent a village and this will be once again a wide angle distant shot capturing as much of the information as possible.This shot in particular will place the viewer's eye at the top of a cliffe and will represent a land that extends from the village in the mid-ground with a lake up till distant mountains. The idea behind this shot would be to made viewer explore the terrains in the mid-ground which would be less populated with vegetation and will show more of the human inhabitation. This shot in particular looks quite flat and resembles more to those tropical region with brown soil and flat terrain. So I thought of experimenting with one more shot, which is shown below:


Both shots at this moment looks completely flat, this might be due to the fact I haven't used any architectural geometry. I am keeping my options open by working on rough concept arts while keeping in mind that I am running few days back from my project schedule.These are few rough concept arts which I am working on these days:

Shot Number 04:


The rough sequence can be found below:

Seq01:WIP


Seq02:WIP


Seq03:


Seq04:WIP


OR


Shot Sequence:-
It's been a while since I updated my Blog , mainly because it was slightly difficult for me to decide on what would be the best shot sequence for the entire project and I realized that at times experience with some 3D applications can be overwhelming.
Finally after some discussion with my faculty and feedback from friends I realized the above rough sequence shots were lacking some objects around which a story can be evolved.The shot number 4 in the last post is flat and not interesting as it contains a foreground and background with no elements in the mid ground to give it a more depth. After making some adjustment to these shots below is the list of final shots and my thoughts on why I choose them as my final painting shots.

Shot01:


This aerial shot represents starting of a journey to a place which is located somewhere along the path of the river. Placing few small houses in the background suggest existence of inhabitation and presence of tower in the mid-ground shows some traces of ancient culture which shows that the land is being protected and closely watched.
The composition seems to be working fine however I am working on the textures for vegetation as the scene has uneven details starting from Mid-ground to the background. There are some perspective issues with the river current and, sharpness of other elements like Tower in the mid-ground and mountains in the background.
The entire image took 2 days to get finished and was the fastest of all paintings I did on this project however it lacks detail at the same moment.

Shot02:


This shot needs texturing and I am thinking to remove waterfall in the foreground with a big cliff while keeping in mind the amount of time I have left with me.

Shot03:


This is the shot which I am working on these days and trying to finalize it as soon as possible.


As with the Seq03 in the above post, the idea behind its creation still remains the same, however I made some composition adjustment by changing foreground and making the monastery slightly massive to make it capture more attention in the scene. I made changes in the light direction in the scene and working on the texture for the mid-ground architecture, I will update the changes as soon as they are done from my end.

Shot04:
IMAGE:


1K Rough Projection:


I am almost done with this shot as it requires a bit more attention to the colour correction in some region and few adjustment to the mid-ground houses. The idea behind this shot is to represent an Asian village which closely resembles to the Tibetan architecture showing the influence of Buddhism on the civilization.
As a last shot I want to move slowly towards the architecture in the mid-ground while maintaining the focus on the big architecture in the middle. The projection shown above is a rough camera move for the painting and it has some issues with the parallax in foreground elements. As this moment I am thinking of adding some reflection in the scene by rendering out specular pass for my architecture and the water which will surely increase the believability of the scene.

Final Shot Sequence:


Well, it was quite hard for me to make this decision to choose three out of my four paintings as final shot sequence because I wanted to learn more about compositing and video editing. I think as I am a week and few days behind my schedule and, learning and  experimenting being the top most priority made me to take this decision. In order keep up with the quality and to learn more I decided to do shot 1(which I is edited now), shot3 and shot4 as my final shots. I learnt few compositing techniques which I will update later in this blog.
Here are the final adjustments and changes which I made to these shots:

Shot01:

This will be the first shot in the animation which will suggest a path to some place which is hiding in big mountains. In order to support this suggestion I thought of making use of a snake style river and some Buddhist tower like architecture to give it an Asian look. I got the inspiration of doing this shot from "Tiberius Viris" who has done matte painting for famous Hollywood films. (ref_website-http://www.suirebit.net)


Shot02:


This is the second shot probably the one at which I worked the most starting from the concept art to final Image. One can find a very close reference for this image in one of the above posts (named SEQ03), I thanks my faculty ,especially Mr. Martin Bowmann who was actually responsible for me to think about  Shot 03 and Shot 02.

The idea behind this shot is to capture some North Indian Buddhist Monastery which has some religious significance and suggests faith/belief of inhabitants living around this area.In order to represent this suggestion I thought of adding some fire which usually is one of the important elements in the nature along with water some land and wide sky. I think apart if one do not consider a bit more activity in the mid ground or background I am satisfied with this image.
My inspiration for this shot came from "The Fire Temple"( http://www.vimeo.com/20015012) from "Igor Staristin".


Shot03:
This is the final shot which represents a typical Himalyan Village. The main purpose of this composition was to show existence of some civilization whose idea I am carrying with my Shot01 and Shot03.
One can easily look at the architecture of house, the white and red colour paint over the wall which represents a village influenced by Asian architecture and Buddhist influence.on the culture.
This painting is inspired by once again from one of the work done by "Igor Staristin" (http://mattepainting.org/vb/showthread.php?t=6470&highlight=Shamanik&page=2).


Wednesday 15 June 2011

PREPRODUCTION

Here are some activities which I am doing and I did my in this phase. Although I am running behind the schedule for my project , however I know that to get this phase as accurate as possible in relation to the basic concept of the project will decide the outcome of the project. The major reason for this delay in the project is because I am still not convinced with the concept arts or sketches that will represent the evocation of a place. Unlike a single matte painting shot where one has to focus on a single shot, this entire project would be a sequence of matte paintings thus it became very important for me to prepare and study concepts like colour harmony and storytelling , which are vital for tasks like animation.

To accomplish this I divided the entire activity in to sub tasks for example studying colour and mood of different environments, terrain study, concept arts/storyboard and pre visualization of shots. Some of the concept art work and paintings which I am working on can be found below:

Understanding Tones:
A grey tone painting which I did to understand how tones varies with the distance:


Using different picture mattes for 'A Monastery':
This painting was done to explore the color harmony and power of using small picture mattes to produce a matte painting. Few of the work here for example the bridge is painted and rest are the samples of different pictures:
References are mentioned below:


Concept arts in Progress:
This is the small waterfall shot which I am working on these days along with other sketches, the idea for this concept artwork is to capture the location of a place which is situated far from the urbanization in nature. The sketch itself is incomplete however my progress can be seen at the below:

One more concept art which is almost complete :

These sketches should be completed in a week.

These are few more sketches which are based on two different environments, the first one is the practice to capture a  mountain covered with snow and intense clouds. 


This second image helped me in understanding reflection and a bit more wild environment. I liked painting this image as it has a nice blend of blue sky reflected by the water source.


There is still some amount of work which needs to be done to decide on the final film color palette for the animation, a sample for the same decision making process can be found below:


Technical Tests:

A small quick set up inside VUE to prepare a rough Terrain with snow:

Hi all,

I completed the waterfall concept art and the main concept (as explained earlier) is captured by introduction of a small architecture in the mid ground which is connected with the bridge to the left side of the terrain. In my opinion the bridge helped me in selling the idea behind the architecture as it makes it quite realistic while keeping it still in isolation from the dense population.I still think that the light set up needs a bit of tweaking to enhance the mood of the picture while doing so the change in the proportion of the small hill with the architecture might help to sell the idea, the finished artwork can be found below:


One more Vue render test while studying different Material Texture and render nodes inside Vue. I quite like Vue's ability to render scene in multiple passes that allows one to render out different image information like alpha channel,depth ,colour information etc, which can later be used later in post production. It took 4 minute to render:


A Thought About Matte Painting Sequence
:

After working on concept arts I made a small plan to formulate a sequence for my matte painting. The entire animation would be divided in to four major shot categories starting from a shot which will show a distant place in Himalayas to a close-up shot which will reveal different terrains and other features.
Below is the small description about shots and the content they will represent:


While Following the same Shot sequences I worked on few Concept arts and rough 3D Renders which helped me in visualizing the scene and the scenario a bit better. Artworks and their descriptions produced by me in a week period of time can be found below:

Shot_Sequence_01- A Mountainous Place


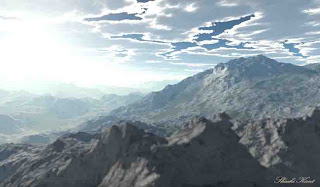
This is a rough render from VUE and this helped me in visualizing a place which is situated at a great altitude. I am thinking of making a river right at the bottom of mid mountains which will give it a bit more natural look. Beside this in my opinion the Mid mountain terrain requires slightly different texture-not Brown Of course- as it represents a terrain at some height.
So my options for the mountain texture would be more confined to different variations of Grey colour. Moreover, trees on the mountain on the mid ground are slightly big in size and therefore are in a way of conveying the idea of massiveness.I would like to change the light which right now is very sharp and coming straight from the camera's point of view, changing the position of the light source right in the back ground or behind the left mountain range might help in this case.

Feasibility study and planning

Well, feasibility study is the major part of the project and I was kind of unsure about how much time and resources would a single piece might require. I found 'www.mattepainting.org' website a nice place to answer my basic questions and it helped me in the project planning preparation activities like Gantt Chart, below are the links for references which I found interesting and helpful in deciding the overall project feasibility.

1.) http://www.mattepainting.org/vb/showthread.php?t=5948
2.) http://mattepainting.org/vb/showthread.php?t=3741
3.) http://skybase.wordpress.com/category/matte-painting/

The preparation of the gantt chart was really helpful in pinning down small activities and their start and end dates. The pre-planning made it possible for me to figure out tasks that needed more attention and practices before they can be implemented, e.g. simulations and projections techniques. Following are few snapshots of all activities which I did while planning for the project:

Project timeline Overview:


4 Word Activity to Understand Evocation of a place:


An Overview About the Project

Hi,

My name is Shashi Kant, I am working on a short animation project of (45-55 sec) which will consist of 4-5 2D-matte paintings projected on 3D geometries. The main idea behind the project is to creatively represent the existence of different rural places situated in Himalayas near a place known as Kinnaur (INDIA). In order to keep a track of the entire process I am using this place to upload my day to day progress and any issues which I might encounter throughout the process.


This project on evocation of a place through matte painting will be targeted to those audiences who love to explore new places and are interested in adventurous and exotic locations. Besides this the project has some significance for people those who will require Environment Matte Paintings for their projects.
Personally, I chose the project as I wanted to learn more about the techniques used to produce a Matte Painting, and explore as many techniques involved in integrating different effects to this art.
2D concept artwork and 2D painting, 3D Projection, Com positing for this project will be done by using Adobe Photoshop, Auto desk- Maya and Nuke respectively.

Here are some of the places located near Kinnaur:


Ref:http://himachal.us/2008/05/01/magnificent-kinnaur/5228/tourism/places/sapt